Flutterでアプリのウィジェットを作成する
これはエキサイトホールディングス Advent Calendar 2022 23日目の記事です。Flutterでアプリのウィジェットを作成する方法を紹介します。AndroidとiOSで異なる方法で実装するのですが、今回はAndroidアプリへの実装方法について紹介します。 Flutterでウィジェットを作る場合はDartよりもネイティブ部分(Swift/Kotlin)を編集することになるので、色々調べながらの実装でした。
※注:本記事におけるウィジェットとは、スマートフォンのホーム画面にアプリの情報を表示するウィジェットのことを指します。
環境
今回は状態管理パッケージであるRiverpodとウィジェットへのデータ送信をサポートとするhome_widgetというパッケージを使用しました。pubspec.yamlのdependenciesを次のように修正し、flutter pub getを実行することでインストールできます。
dependencies:
  flutter:
    sdk: flutter
  flutter_riverpod: ^2.1.1

  cupertino_icons: ^1.0.2
  home_widget: ^0.1.6
手順
新しいFlutterプロジェクトを作成したあることを前提に説明します。
背景の作成
最初に、ウィジェットの背景を作成します。今回はデモアプリなので真っ白な背景を実装します。
android/app/src/main/res/drawableというディレクトリを作成します(最初から作成されているかもしれません)。そのディレクトリ中にwidget_background.xmlを作成し、中身を次のように書きます。ファイル名は何でも良いですが、後ほど参照することになるので、適宜対応してください。
<?xml version="1.0" encoding="utf-8"?>
<shape xmlns:android="http://schemas.android.com/apk/res/android">
    <solid android:color="#FFFFFF"/>
    <corners android:radius="16dp"/>
</shape>
ウィジェットに表示する内容の作成
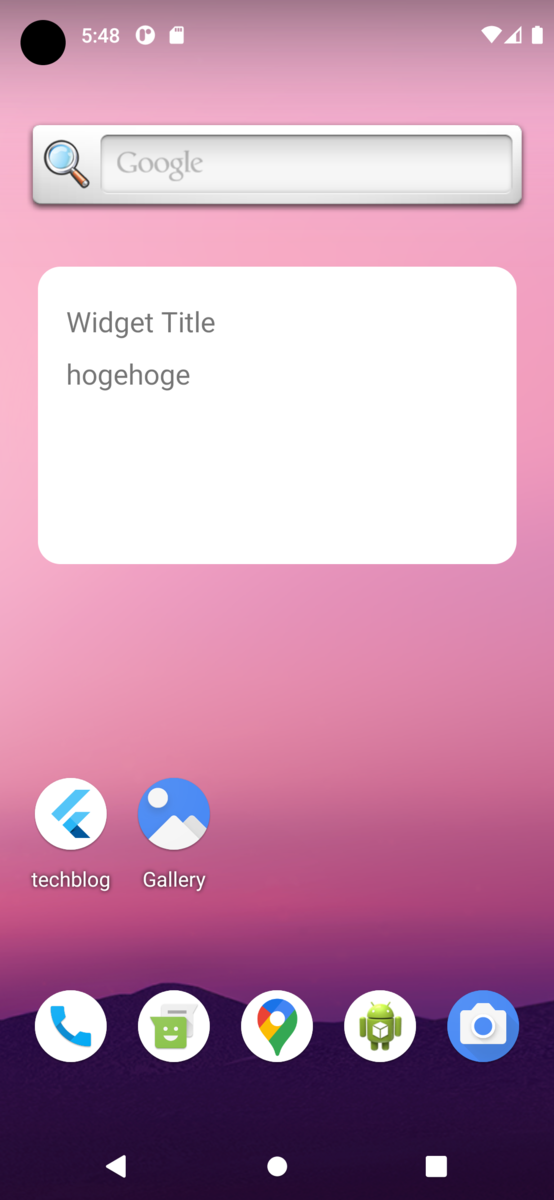
次に、ウィジェットに表示する内容を書いていきます。今回はシンプルなテキストを2つ並べるだけとします。文字だけではなく図形なども表示できるようです。
android/app/src/main/res/layoutというディレクトリを作成し、widget_layout.xmlの内容を次のようにします。
<?xml version="1.0" encoding="utf-8"?>
<LinearLayout
    xmlns:android="http://schemas.android.com/apk/res/android"
    android:layout_width="match_parent"
    android:layout_height="match_parent"
    android:orientation="vertical"
    android:background="@drawable/widget_background"
    android:layout_margin="5dp"
    android:padding="20dp">
    <TextView
        android:id="@+id/widget_title"
        android:layout_width="wrap_content"
        android:layout_height="wrap_content"
        android:textSize="20sp"
        android:layout_marginVertical="5dp"
        android:text="Title" />
    <TextView
        android:id="@+id/widget_message"
        android:layout_width="wrap_content"
        android:layout_height="wrap_content"
        android:layout_marginVertical="5dp"
        android:textSize="20sp"
        android:text="Message" />
</LinearLayout>
ウィジェットの設定
次に、ウィジェットの大きさや形などを設定していきます。
android/app/src/main/res/xmlというディレクトリを作成し、widget_configuration.xmlを作成します。内容は次のようにします。
android:initialLayout="@layout/widget_layout"の部分は先ほど作ったファイル名と一致している必要があります。
<?xml version="1.0" encoding="utf-8"?>
<appwidget-provider xmlns:android="http://schemas.android.com/apk/res/android"
    android:minWidth="40dp"
    android:minHeight="40dp"
    android:updatePeriodMillis="86400000"
    android:initialLayout="@layout/widget_layout"
    android:resizeMode="horizontal|vertical"
    android:widgetCategory="home_screen">
</appwidget-provider>
マニフェストの作成
Androidの知識があまりないのですが、どうやらアプリがウィジェットを使うことを宣言する必要があるようです.android/app/src/main/AndroidManifest.xmlに必要な情報を追記していきます。
<manifest xmlns:android="http://schemas.android.com/apk/res/android"
    package="com.example.techblog">
   <application
        android:label="techblog"
        android:name="${applicationName}"
        android:icon="@drawable/launch_background">
        <activity
            android:name=".MainActivity"
            android:exported="true"
            android:launchMode="singleTop"
            android:theme="@style/LaunchTheme"
            android:configChanges="orientation|keyboardHidden|keyboard|screenSize|smallestScreenSize|locale|layoutDirection|fontScale|screenLayout|density|uiMode"
            android:hardwareAccelerated="true"
            android:windowSoftInputMode="adjustResize">

            <meta-data
              android:name="io.flutter.embedding.android.NormalTheme"
              android:resource="@style/NormalTheme"
              />
            <intent-filter>
                <action android:name="android.intent.action.MAIN"/>
                <category android:name="android.intent.category.LAUNCHER"/>
            </intent-filter>
        </activity>
        <meta-data
            android:name="flutterEmbedding"
            android:value="2" />
        <!-- この部分を追加 -->
        <receiver android:name="HomeScreenWidgetProvider"
                  android:exported="true">
            <intent-filter>
                <action android:name="android.appwidget.action.APPWIDGET_UPDATE" />
            </intent-filter>
            <meta-data android:name="android.appwidget.provider"
                       android:resource="@xml/widget_configuration" />
        </receiver>
        <!-- ここまで -->
    </application>
</manifest>
ウィジェットを呼び出すクラスを作成
ウィジェットを呼び出すクラスを作成します。MainActivity.ktが存在するディレクトリにHomeScreenWidgetProvider.ktを作成します。内容は次のとおりです。
package com.example.techblog
import android.appwidget.AppWidgetManager
import android.content.Context
import android.content.SharedPreferences
import android.widget.RemoteViews
import es.antonborri.home_widget.HomeWidgetProvider

class HomeScreenWidgetProvider : HomeWidgetProvider() {
    override fun onUpdate(context: Context, appWidgetManager: AppWidgetManager, appWidgetIds: IntArray, widgetData: SharedPreferences) {
        appWidgetIds.forEach { widgetId ->
            val views = RemoteViews(context.packageName, R.layout.widget_layout).apply {
                setTextViewText(R.id.widget_title, widgetData.getString("title", null) ?: "No Set title")
                setTextViewText(R.id.widget_message, widgetData.getString("message", null)?: "No Set message")
            }
            appWidgetManager.updateAppWidget(widgetId, views)
        }
    }
}
setTextViewText(R.id.widget_title, widgetData.getString("title", null) ?: "No Set title")の部分でウィジェット内のテキストに値を渡しています。この行では、後ほど作成するmain.dart内でtitleと定義している値をウィジェット内のwidget_titleという値と対応させています。ウィジェットに情報を追加したい場合、このあたりの処理を追加し、widget_layout.xmlにも追記する必要があります。
ウィジェットへデータを受け渡す処理の作成
ここらはmain.dartを修正していきます。main.dartは次のように作り直しました。テキストボックスとボタンだけがあるシンプルなUIです。データの管理はRiverpodを使用しています。
import 'package:flutter/material.dart';
import 'package:flutter_riverpod/flutter_riverpod.dart';
import 'package:home_widget/home_widget.dart';

final messageProvider = StateProvider((_) => "Message");
void main() {
  runApp(const ProviderScope(child: MyApp()));
}

class MyApp extends StatelessWidget {
  const MyApp({super.key});
  @override
  Widget build(BuildContext context) {
    return MaterialApp(
      title: 'Flutter Demo',
      theme: ThemeData(
        primarySwatch: Colors.blue,
      ),
      home: const HomeScreenWidget(),
    );
  }
}

class HomeScreenWidget extends ConsumerStatefulWidget {
  const HomeScreenWidget({super.key});

  @override
  ConsumerState createState() => _HomeScreenWidgetState();
}

class _HomeScreenWidgetState extends ConsumerState<HomeScreenWidget> {
  final messageController = TextEditingController();

  // ウィジェットにデータを送る処理
  Future<void> _sendData() async {
    await Future.wait([
      HomeWidget.saveWidgetData<String>('title', "Widget Title"),
      HomeWidget.saveWidgetData<String>('message', ref.read(messageProvider)),
    ]);
  }

  // ウィジェットを更新する処理
  Future<void> _updateWidget() async {
    await HomeWidget.updateWidget(
      name: 'HomeScreenWidgetProvider',
      androidName: 'HomeScreenWidgetProvider',
      iOSName: 'HomeScreenWidget',
    );
  }

  @override
  Widget build(BuildContext context) {
    return Scaffold(
      appBar: AppBar(
        title: const Text("HomeScreenWidget App"),
      ),
      body: Center(
        child: Padding(
          padding: const EdgeInsets.all(30),
          child: Column(
            crossAxisAlignment: CrossAxisAlignment.start,
            children: [
              TextField(
                decoration: const InputDecoration(
                  label: Text("Text to display widget"),
                  border: OutlineInputBorder(),
                ),
                controller: messageController,
              ),
              ElevatedButton(
                onPressed: () async {
                  ref.read(messageProvider.notifier).state =
                      messageController.text;
                  _sendData();
                  _updateWidget();
                },
                child: const Text("Update widget"),
              )
            ],
          ),
        ),
      ),
    );
  }
}
_sendData()と_updateWidget()がウィジェットを更新する際に必要となる処理です。_sendData()でウィジェットにdartから値を送り、_updateWidget()でウィジェットの内容を更新します。今回の実装ではボタンのオンクリックイベントの際にこの2つの関数を呼び出し、テキストボックス内の文字列をウィジェットに送信し、ウィジェットの表示を更新しています。
デモアプリの画面


おわりに
Flutterでウィジェットを作成する場合、Dartではなくネイティブコードをいじることが多く、苦戦しました。iOSの場合はGroup IDの設定などがあり、より一層ややこしくなるので、気が向いたら書きたいです。FlutterだけではなくSwiftやKotlinの勉強も大切だと気付かされました。本記事が参考になれば幸いです。